Milk punch sounds like a drink for your grandmother. It’s not. This clarified cocktail dates back to the 1700s, and it’s having a serious moment in modern bars. The process looks like magic: you mix milk with spirits and citrus, watch it curdle, then strain out the solids. What’s left is a crystal-clear, silky-smooth drink that tastes nothing like milk.
The drink disappeared for decades. Now it’s on cocktail menus in New York, London, and Tokyo. You can make it at home, too. You just need to pick a path: the cheap way or the proper way. Both work. They just give different results.
KITESSENSU
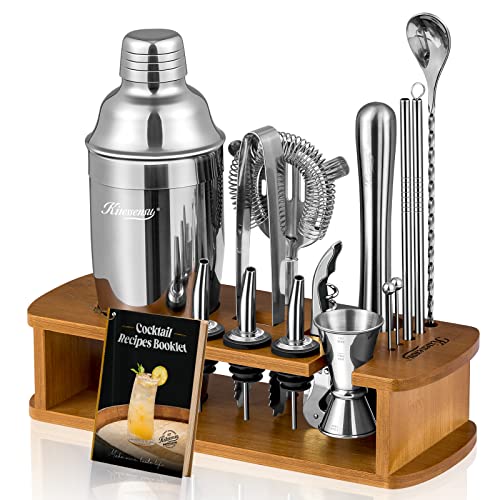
KITESSENSU Cocktail Shaker Set Bartender Kit with…
- Made to Last: Upgraded 18/8 stainless steel bartender kit cocktail set is your best bet, which is specially thickened (0.8 mm) to…
- Raise The Atmosphere: The bartenders will benefit from a stand, allowing you to keep your bar kit set organized and also on full d…
- Top-Notch Gift: This cocktail mixing set is the best gift everyone at the party will be talking about, it comes in a stylish, pack…

What Is Milk Punch, Exactly?
Milk punch is a cocktail that uses milk to clarify the liquid. The milk curdles when you add acid (usually citrus or tea), trapping impurities and harsh tannins. You strain out the curds, and the remaining liquid is smooth, clear, and shelf-stable.
Historically, people made milk punch as a way to preserve spirits for months. The sugar and alcohol act as preservatives. You can bottle it, age it, and drink it weeks later. It’s a party trick and a science experiment in one glass.
The flavor profile is what surprises most people. You get the bright notes of citrus and tea, the warmth of bourbon or rum, and a round, almost creamy mouthfeel. There’s no actual cream left behind, but the texture feels rich.
The Cheap Way: A Mason Jar and a Coffee Filter
You can make milk punch with things you already own. A mason jar, a fine-mesh strainer, and a paper coffee filter will do the job. The process takes about 20 minutes of active work, plus a few hours of waiting.
Here’s the basic method. Combine your base spirit, citrus juice, sweetener, and tea or water in a jar. Add whole milk and stir gently. Let it sit for 10 minutes. The mixture will separate into curds and clear liquid. Strain through a coffee filter. Repeat if needed.
The cheap way costs almost nothing. You probably have milk, lemons, sugar, and a bottle of bourbon or rum already. The only extra purchase might be a coffee filter, and those are a few cents each.
Is the cheap way good enough? For a casual weekend project, yes. The drink will be clear and taste fine. But the texture won’t be as silky, and you might need to strain twice to remove all the fine particles. It’s also harder to get a consistent result because paper filters vary in thickness.
The real cost of the cheap way is time. You’ll wait 2 to 4 hours for the first strain, then maybe another hour for a second pass. If you’re making a batch for a party, that’s a lot of waiting. The cheap way also produces more waste—you’ll toss the curds and the used filters.
Another downside: the cheap way doesn’t scale well. Making a single serving is easy. Making a gallon for a gathering means multiple filters and multiple rounds of straining. You’ll spend your whole afternoon at the sink.
The Proper Way: Invest in a Good Cocktail Kit
The proper way uses better tools and a more controlled process. You want a sturdy shaker, a precise jigger, a fine strainer, and a mixing spoon. These tools make the process faster and more reliable.
One kit that works well for this is the KITESSENSU cocktail shaker set. It includes a Boston shaker, a jigger, a strainer, a muddler, and pour spouts. The stainless steel is 0.8 mm thick, so it won’t dent or rust easily. The stand keeps everything organized on your counter.
With a proper kit, you can use a fine-mesh strainer that catches more particles than a paper filter. You can also use the shaker to mix the milk and acid more thoroughly, which helps the curds form evenly. The result is a cleaner, more consistent clarification.
The proper way also opens up more advanced techniques. You can do a double strain with a cheesecloth-lined strainer for an even smoother finish. You can batch larger quantities because the fine-mesh strainer doesn’t clog as fast as paper.
Is the proper way worth the money? That depends on how often you make cocktails. If you’re already into mixology, you’ll use the kit for dozens of other drinks. The shaker and jigger are not one-trick ponies. They’re everyday tools.
If you only drink milk punch once a year, the cheap way is fine. But if you want to make it regularly, or if you’re curious about other classic cocktails, the proper kit pays for itself quickly.
One honest caveat: even with a good kit, milk punch takes practice. The first batch might come out slightly cloudy. That’s normal. You’ll learn how long to let the curds settle and how much pressure to apply when straining.
Comparing the Two Paths
| Aspect | Cheap Way | Proper Way |
|---|---|---|
| Cost | Almost nothing (you likely have supplies) | Moderate one-time kit purchase |
| Time per batch | 20 minutes active + 2–4 hours waiting | 15 minutes active + 1–2 hours waiting |
| Clarity | Good, but may need a second strain | Excellent, usually clear on first pass |
| Consistency | Variable, depends on filter quality | Reliable, thanks to fine-mesh strainer |
| Scaling up | Poor, filters clog quickly | Good, can batch a liter or more |
| Other uses | None | Shaker, jigger, and strainer for any cocktail |
The table shows the real trade-off. The cheap way saves money but costs time and patience. The proper way costs money but saves time and gives you tools you’ll use for years.
If you’re on a tight budget, start with the cheap way. Make a single batch. See if you like the drink. If you’re hooked, then invest in a kit. That’s a reasonable path.
If you already own a shaker and strainer, you’re most of the way there. You just need a fine-mesh strainer with a tight weave. You can buy one separately for a few dollars.
How to Make Milk Punch: A Step-by-Step Recipe
Here’s a basic recipe that works with either method. It’s adapted from historical recipes but simplified for home use.
Ingredients
- 1 cup whole milk
- 1 cup strong black tea (or water)
- 2 oz bourbon or dark rum
- 1 oz fresh lemon juice
- 1 oz simple syrup (or 1 tablespoon sugar dissolved in water)
- Pinch of nutmeg (optional)
Instructions
- Combine the tea, bourbon, lemon juice, and simple syrup in a large jar.
- Pour in the milk all at once. Do not stir yet.
- Wait 5 minutes. The mixture will curdle.
- Stir gently with a spoon. You’ll see clear liquid forming.
- Set up your strainer over a clean jar. Use a fine-mesh strainer lined with a coffee filter (cheap way) or a fine-mesh strainer alone (proper way).
- Pour the mixture through the strainer. Let it drip slowly. Don’t press the curds.
- Once the liquid stops dripping, discard the curds. If the liquid is still cloudy, strain again through a fresh filter.
- Chill the clarified punch in the fridge for at least 1 hour.
- Serve over a large ice cube. Garnish with a lemon twist or a dusting of nutmeg.
That’s it. The drink will be clear, smooth, and surprisingly refreshing. It keeps in the fridge for up to two weeks, so you can make a batch ahead of time.
The Science Behind the Magic
Milk contains proteins called casein. When you add acid, those proteins unfold and clump together. The clumps trap tannins, bitterness, and other suspended particles. When you strain them out, the liquid becomes clear.
This process also removes some of the harsh edges from the alcohol. The result is a smoother, more mellow drink. It’s why milk punch was so popular in the 18th century—it made cheap spirits taste better.
You can use any acid, not just lemon. Some recipes use grapefruit juice, vinegar, or even wine. The key is to use enough acid to curdle the milk completely. If you don’t see curds within 10 minutes, add a little more citrus.
The type of milk matters, too. Whole milk works best because it has more fat and protein. Skim milk will clarify too, but the texture will be thinner. Non-dairy milks like almond or oat won’t work—they don’t have the same proteins.
Variations to Try
Once you master the basic recipe, experiment with different spirits and flavors. Here are three variations worth trying.
Tea Punch
Use a strong black tea like Earl Grey or Darjeeling. Add a little bergamot oil or a strip of orange peel for extra aroma. This is the classic style that was popular in colonial America.
Spiced Rum Punch
Swap bourbon for a spiced rum. Add a cinnamon stick and a star anise to the tea while it steeps. The spices come through beautifully after clarification.
Citrus-Forward Punch
Use equal parts lemon and lime juice. Add a splash of orange liqueur like Curaçao. The result is brighter and more tropical, perfect for summer.
Each variation takes the same amount of time. The only difference is the flavor profile. Try them all and see which one you like best.
Why Milk Punch Is Coming Back
Bartenders love milk punch because it’s versatile and impressive. You can batch it, bottle it, and serve it from a tap. It also looks stunning—a clear, amber-gold liquid that tastes complex and smooth.
Home drinkers are discovering it too. Social media has made the clarification process look like magic. People film the curdling and straining, and viewers are fascinated. It’s a great conversation starter at parties.
There’s also a practical side. Milk punch lasts longer than regular cocktails. You can make a big batch on Sunday and drink it all week. That’s a big win for anyone who likes a cocktail after work but doesn’t want to mix one every night.
The milk tea connection is worth noting too. Both drinks use milk and tea, but milk punch takes it a step further by clarifying. If you like milk tea, you’ll probably like milk punch.
Frequently Asked Questions
Does milk punch taste like milk?
No. The milk solids are removed during straining. The drink tastes like a smooth, clarified cocktail with a silky texture. There’s no creamy flavor left.
How long does milk punch last?
Stored in an airtight container in the fridge, it lasts up to two weeks. The alcohol acts as a preservative. The flavor may mellow over time, but it stays safe to drink.
Can I use any type of milk?
Whole milk works best. Skim milk works but gives a thinner texture. Non-dairy milks don’t have the same proteins, so they won’t clarify properly.
Why is my milk punch still cloudy?
You probably didn’t strain it enough. Run it through a fresh coffee filter or a finer mesh strainer. Also, make sure the curds have fully formed before straining—wait at least 10 minutes.
Can I make milk punch without alcohol?
Yes. Substitute the spirit with more tea or fruit juice. The drink will still clarify, but it won’t keep as long. Drink it within a few days.
What’s the best spirit for milk punch?
Bourbon and dark rum are classic choices. You can also try brandy, aged rum, or even gin for a lighter flavor. Avoid overproof spirits—they can be too harsh.
Get the Right Tools
If you decide to invest in a proper cocktail kit, look for one that includes a shaker, jigger, and strainer. The KITESSENSU set is a solid choice. It’s made from thick stainless steel, so it won’t dent or rust. The stand keeps everything in one place, which is handy when you’re working through a recipe.
One thing to note: the set includes a muddler and pour spouts, which you might not need for milk punch. But those tools come in handy for other cocktails. It’s a good all-around kit for a home bar.
Check the current price on Amazon if you’re interested. Prices change often, so it’s worth a quick look.
If you’re still on the fence, try the cheap way first. You’ll learn the technique and taste the result. If you love it, you’ll know that a proper kit is worth the money.
Milk punch is a classic for a reason. It’s delicious, impressive, and surprisingly easy once you know the steps. Whether you use a mason jar or a full bar kit, the reward is the same: a smooth, clear cocktail that looks like magic and tastes even better.


