You’ve got your spinach, your banana, your protein powder. Then you grab the ginger root, and suddenly the whole smoothie operation stalls. Peeling that knobby, fibrous thing with a vegetable peeler takes forever, and if you just hack it into chunks, your smoothie ends up with those annoying stringy bits that get stuck in your teeth. It’s a small problem, but it kills the vibe.
This guide fixes that. You’ll learn exactly how to prep ginger for smoothies, from the spoon-peel trick to the correct slice thickness for your specific blender. I’ll also cover how much to use, how to store it, and why cutting against the grain matters more than you think. No fluff, just the method that works.
Deiss
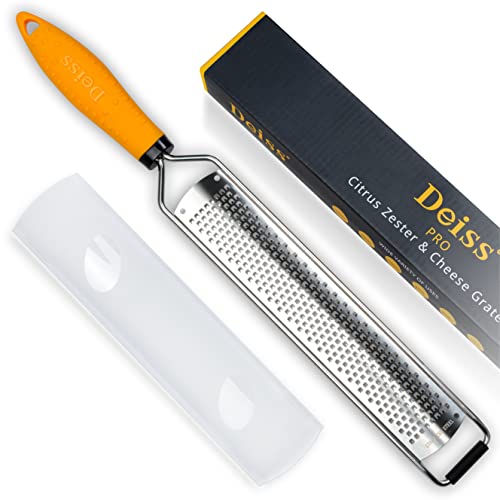
Deiss PRO Lemon Zester & Heavy Duty…
- Comfortable to Use & Built to Last ✔ The Hand Grater has a razor-sharp stainless steel blade that won't rust and a comfortable, no…
- Save Space in The Kitchen And Drawer ✔ Replace your bulky, unsafe, and hard-to-clean box grater, cheese grater electric, cheese gr…
- Improve Your Cooking ✔ Amaze your friends with new, restaurant-like recipes. Add strong new flavours with fresh lemon zest without…
One tool that makes this whole process noticeably faster is a high-quality rasp grater. The Deiss PRO Lemon Zester & Heavy Duty Grater handles ginger beautifully, turning a knob into a fluffy pile in about 15 seconds. Its razor-sharp stainless steel blade won’t rust, and the curved sides give you extra leverage when you hit a tough, woody section. It’s not perfect for every job, but for ginger and garlic, it’s my go-to.

Why Cutting Ginger Correctly Matters for Smoothies
Ginger’s flavor comes from gingerol, a compound that’s concentrated in the juice. The fiber, however, is the enemy. Those long, stringy strands don’t break down in a standard blender jar; they wrap around the blades and float in your glass like little pieces of dental floss.
Cutting ginger against the grain shortens those fibers. Think of it like celery. If you pull a celery stalk apart, you see the strings. Cutting across those strings makes them tiny and harmless. Same logic applies to ginger root. Slicing across the grain, perpendicular to the direction the fibers run, gives you short pieces that blend completely. Slicing with the grain leaves long, tough strands.
Your blender’s power also dictates the cut size. A 1,000-watt motor can pulverize a one-inch chunk. A 300-watt motor will struggle with anything bigger than a thin coin. Match the cut to your machine, and you’ll never deal with stringy smoothies again.
Tools You Need (and the One Tool to Skip)
For most smoothie prep, you need exactly three things:
- A sharp knife (a paring knife works best for the small, knobby root)
- A spoon (yes, a regular teaspoon from your drawer)
- A cutting board
That’s it. You can skip the vegetable peeler entirely. It wastes too much of the root and struggles with the crevices. A spoon does the job faster and wastes less.
If you want a fourth tool, get a microplane or a fine rasp grater. The Deiss grater mentioned earlier is a solid choice because it’s sturdy enough to handle hard ginger without flexing. It’s also a breeze to clean, which matters when you’re making smoothies every morning. Just rinse it under running water and the ginger pulp falls right off.
Step-by-Step: How to Cut Ginger for Smoothies
Here’s the exact process I use, tested across dozens of smoothie batches.
Step 1: Wash and Dry (The Slippery Fix)
Wet ginger is dangerously slippery. You’ll lose a fingertip if you try to slice it right after rinsing. Wash the root under cold water, then dry it thoroughly with a clean kitchen towel. Pat it dry, don’t just wave it around. A dry surface gives you a secure grip, and that grip is what prevents accidents.
Pro tip: If your hands are naturally sweaty, rub a little salt on your fingers before handling the ginger. It sounds odd, but it works.
Step 2: The Spoon Peel vs. The Knife Peel
Hold the ginger root in one hand and the edge of a teaspoon in the other. Scrape the spoon edge along the skin, following the contours of the root. The skin comes off in thin strips, and you lose almost none of the flesh underneath. This method is particularly effective on the knobby parts where a peeler can’t reach.
A knife works too, but you’ll lose more ginger. You have to cut off the skin in slices, which takes a chunk of the root with it. For a smoothie, where you’re only using a tablespoon or two, that waste adds up. The spoon peel takes about 20 seconds longer but saves you a solid 15% of the root.
One caveat: the spoon method doesn’t work well on old, deeply wrinkled ginger. If the skin is tough and papery, just use the knife to cut it off in thick slabs.
Step 3: Slicing Against the Grain (Breaking the Fibers)
Look at the cut end of your peeled ginger root. You’ll see faint lines running lengthwise. Those are the fiber bundles. You want to cut perpendicular to those lines.
Place the root flat on your cutting board. Hold it steady with your fingertips curled under. Slice across the root, perpendicular to those visible lines, into pieces about 1/8-inch thick. If you cut with the grain, you get long, stringy strips. Against the grain, you get tiny, fragile discs that blend instantly.
For woody, old ginger, the fibers are more pronounced. Cut against the grain and then give the slices a rough chop into smaller pieces. This ensures no fiber survives the blender.
Step 4: Chunks vs. Microplane (Blender Type Matters)
Here’s the rule:
- High-speed blender (800W+): Use thin slices or rough chunks. The motor will handle them fine.
- Standard blender (under 800W): Use the microplane to grate the ginger into a fine pulp, or cut it into extremely thin slices (paper-thin, like a coin).
Grating releases the ginger juice and leaves the fibrous pulp behind on the grater. You get all the flavor and none of the texture. This is the fail-safe method for weaker blenders. It takes an extra 30 seconds, but it guarantees a smooth result.
Pro tip: Freeze the ginger root before grating. Frozen ginger grates more cleanly and produces less mushy pulp. It also keeps longer, so you always have some on hand.
The “No-Peel” Shortcut: When It’s Safe to Skip
Organic ginger has thin, tender skin that blends fine in a high-speed blender. If you’re using a Vitamix or Blendtec, you can skip peeling entirely. Just wash the root thoroughly, cut it into chunks, and toss it in. The skin adds a tiny bit of fiber and a slightly earthier taste, but most people can’t tell the difference.
For non-organic ginger, don’t skip the peel. Conventionally grown ginger can carry pesticide residues, and those chemicals concentrate in the skin. The peel also tends to be thicker and tougher on non-organic roots, which leaves bitter, fibrous bits in your smoothie.
If you’re unsure about your blender’s power, peel it. The 20 seconds you save isn’t worth the risk of a stringy, bitter smoothie.
How Much Ginger to Use (The Exact Measurement Guide)
Here’s the conversion you’ll actually use:
| Ginger Amount | Grated (Microplane) | Sliced (Thin Coins) | Best For |
|---|---|---|---|
| 1-inch knob (about 6 grams) | 1 tablespoon | 1.5 tablespoons | Single 12-oz smoothie |
| 2-inch knob (about 12 grams) | 2 tablespoons | 3 tablespoons | Large 20-oz smoothie |
| 1/2-inch knob (about 3 grams) | 1.5 teaspoons | 2 teaspoons | Mild flavor, green smoothies |
Start with less. Ginger’s heat builds as it blends, so what tastes mild in the first sip can become overpowering by the last. One inch of fresh ginger per smoothie is the sweet spot for most people. If you’re new to ginger, start with half that and adjust upward.
For reference, a one-inch knob is roughly the size of your thumbnail. That’s the easiest visual cue to remember.
Pro Storage Hacks: Freezing, Pre-Portioning, and Paste
Ginger goes bad fast. A fresh root lasts about two weeks in the fridge, but it starts to shrivel after day five. Here’s how to make it last.
Freeze the whole root. Put the unpeeled root in a zip-top bag and freeze it. Frozen ginger grates easily on a microplane without peeling first. Just scrape off the skin with your spoon while it’s still semi-frozen, then grate. This method keeps ginger fresh for up to six months.
Pre-portion into cubes. Peel and grate a whole root, then pack the grated ginger into an ice cube tray. Each cube holds about one tablespoon. Freeze, pop out, and store the cubes in a freezer bag. Drop one cube into your smoothie blender directly. No thawing needed.
Make a batch of ginger paste. Blend peeled ginger with a little water or oil until smooth. Store it in a jar in the fridge for up to a week, or freeze it in small portions. This is the fastest option for smoothie mornings, but the flavor is slightly less bright than freshly grated ginger.
My personal preference is the frozen whole root. It takes 10 seconds to grate, and the flavor stays sharp and punchy. The paste is convenient, but it loses some of that fresh, spicy kick after a few days.
Common Mistakes That Ruin Your Smoothie (Stringy Texture Fix)
Three mistakes cause almost all ginger smoothie failures. Here’s how to avoid each one.
Mistake 1: Cutting with the grain. This is the biggest culprit behind stringy smoothies. You have to slice perpendicular to the fibers. Look at the cut end, identify the fiber direction, and cut across it. If you’re not sure, cut a thin slice and try to pull it apart. If it separates into strings, you cut the wrong way.
Mistake 2: Using big chunks in a weak blender. A 500-watt blender will not break down a one-inch ginger cube. You’ll get a smoothie that tastes like ginger but has visible, chewy pieces floating in it. Grate it or slice it paper-thin, and the problem disappears.
Mistake 3: Adding ginger to the blender first. When ginger sits at the bottom, under the heavier ingredients, it gets pulverized against the blades repeatedly. That’s actually fine. The real issue is adding it last, where it floats on top and never gets fully blended. Add ginger with the liquids, not with the dry ingredients.
Pro tip: Blend your liquid and ginger together for 10 seconds before adding the rest of the ingredients. This ensures the ginger is fully incorporated and gives you a head start on breaking down those fibers.
FAQ: Quick Answers on Ginger Prep
Can I put ginger skin in a smoothie?
Yes, if the ginger is organic and you’re using a high-speed blender. The skin is thin and edible. For conventional ginger, peel it to avoid pesticide residues and a bitter taste. If your blender is under 800 watts, always peel it, regardless of organic status.
How do I stop ginger from being stringy in my smoothie?
Cut against the grain into thin slices, or grate it with a microplane. Both methods shorten the fibers so they blend completely. Grating is the foolproof option for weaker blenders.
Is it better to use fresh ginger or ground ginger in smoothies?
Fresh ginger has a brighter, more complex flavor with a distinct heat. Ground ginger is milder and can taste dusty. For smoothies, always use fresh. Ground ginger is better suited for baking.
Can I freeze ginger for smoothies?
Absolutely. Freeze the whole unpeeled root for up to six months, or pre-grate it into ice cube trays. Frozen ginger grates more easily than fresh, and it doesn’t lose any of its punch.
How much fresh ginger should I put in a smoothie?
Start with a one-inch knob, which equals about one tablespoon grated. That’s enough for a noticeable ginger kick without overwhelming the other flavors. Adjust from there based on your taste.
Final Blend: Putting It All Together
Here’s the short version you can stick on your fridge:
- Wash and dry the ginger root thoroughly to prevent slipping.
- Peel with a spoon, not a knife, to save the flesh.
- Slice across the grain into thin coins, or grate with a microplane.
- Match your cut size to your blender’s power: thin slices for standard blenders, chunks for high-speed ones.
- Use about one inch (one tablespoon grated) per smoothie to start.
- Freeze the whole root for easy grating and longer storage.
- Add ginger to the blender with your liquids, not on top of dry ingredients.
Ginger adds a bright, warming note that elevates any smoothie. Once you’ve got the prep down, it’s a 30-second addition that feels like a professional touch. And if you’re shopping for a blender that handles ginger without a fight, check out some budget blender options that won’t leave you with stringy pulp. For those with limited counter space, a compact blender can still do the job if you follow the grating rule. And if you’re adding other fibrous ingredients, the flax and chia prep guide covers similar ground.